SWTOR 7.6 Corruption PvP Guide
A Note About Healing
It's very important to note before we get started here: corruption is a healing spec. Healing is an entirely different beast than playing a DPS. You are a support role, you cannot afford to play selfishly, to number farm, et. cetera. Your job is not to hunt down the enemy and kill them. Your job is also not, as many bad healers believe, to respond to damage after it hits. This is an extremely proactive role in 7.0, because burst healing has become literal shit over the past two expansions. Your role is to identify where the enemy team's damage is going, and pattern match your heals accordingly. It's honestly very akin to farming when done properly, and will net you big numbers and look cool. If you're doing it right, your team's health bars should be more or less uniform (or at least those taking damage), and the process should feel like wrestling against the DPS. However, if one teammate randomly drops much lower than the others (due to the tank missing a guard swap or the dps missing a dcd), that is the fault of the person who missed their cue, and you should get upset with them, because having to compensate that difference will likely jeopardize your team's ability to survive as a unit. That is not the same thing as you letting someone get low because you failed to track the incoming damage, however. In that case it is your fault and you should apologize.
In the event that the game doesn't give you a tank, most of the above doesn't apply, and you'll have to spec according to the fact that, unless the enemy team is braindead, they will drop somebody straight through your healing. In that event, you're just prolonging the inevitable in the hopes that your team drops their target first. These types of games are honestly quite boring and you have fairly low impact in them, so we'll prefer to talk about tank games in this guide. I will still show how to spec and use your abilities for heal/dps games, though.
Corruption Builds
The two builds are fairly similar and essentially hinge on whether you need to heal cleave (AOE/distributed damage) or not. If you have a tank, you will always have to heal cleave because their job is to split burst damage into cleave damage, allowing you to heal it more effectively. In a heal/dps game, you more likely than not will have no need to heal cleave, but the presence of certain specs on the enemy team will be your cue to swap into cleave build. These are primarily lethality operative, vengeance juggernaut, or pyrotech powertech. These specs do a ton of rotational AOE damage at the expense of their single-target effectiveness, and you'll want to match the pattern of their damage by doing some AOE healing.
Stim
Use Advanced Kyrprax Versatile Stim. Do not pass go, do not collect two hundred dollars.
Gear and Set Bonus
For legendaries, you want Revitalize Package and Unmatched Haste Package, in that order. Revitalize is far more useful to you on this spec than the Polarity Shift uptime that that Unmatched Haste gives.
For regular gear, you want the best item level gear you can get at any point in time. I recommend using the 1.4 GCD alacrity build, which will require 4 alacrity pieces. Thus, in addition to your legendaries, you will need to get 4 alacrity enhancements and 4 critical enhancements. There are a variety of healing builds out there which play with using more alacrity to shorten cast times, but as healers we are interrupted hyper-aggressively and want to cast as little as possible, meaning we will get far more value from running the GCD breakpoint for our instant abilities, and investing in crit to make said abilities heal for more. The moddable gear vendor Hyde and Zeek is far and away the easiest way to gear, it isn't worth bothering with any other method.
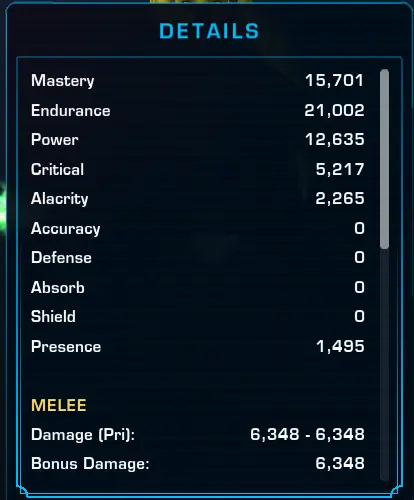
Corruption Stats (332)
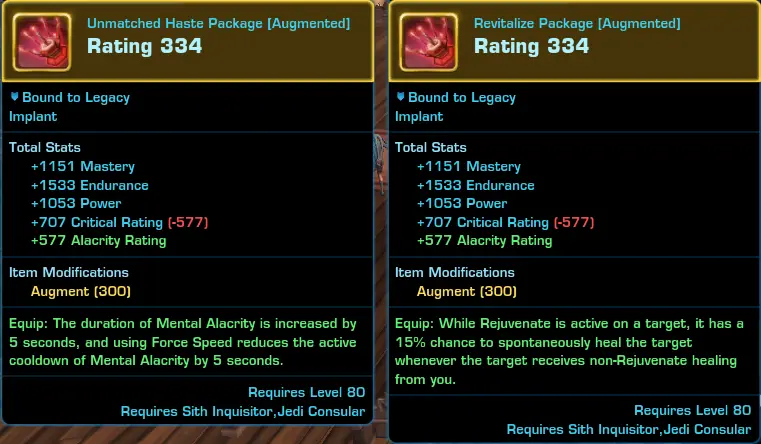
Sorc Healer Implants
Tactical Item
Use the One for All tactical, no exceptions. Do not bother with alternatives like Storm's Succor. They will lower your HPS and cost you your best defensive cooldown, all for the sake of doing a pitiful amount of damage that the enemy healer will easily handle, while his team is punishing your loadout mistake by killing you easily. I have no interest in hearing counter-arguments to this, every single instance of a team ranked healer not taking phase walk against human players results in them getting dog walked.
Augments
If you use the build I've prescribed, all of your augments should be crit augments. If you're freestyling, you'll want to use augments to reach the proper stat thresholds, that being ≥2050 alacrity (for 1.4 second GCD); the rest of your stats go into crit. Do not use accuracy on a healer, ever. It is the easiest thing you can do to brand yourself as a clueless noob in this game. Heals don't miss.
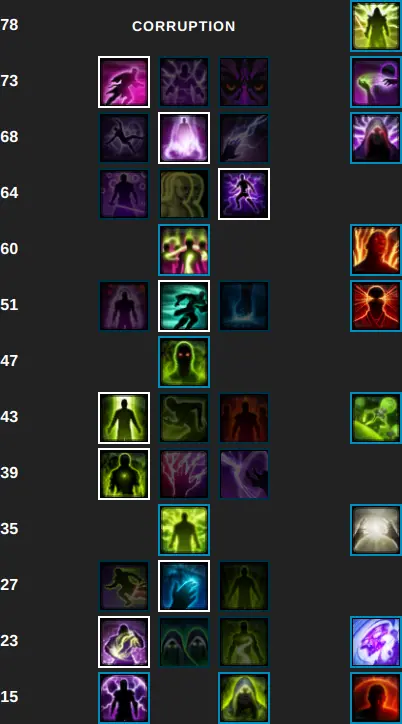
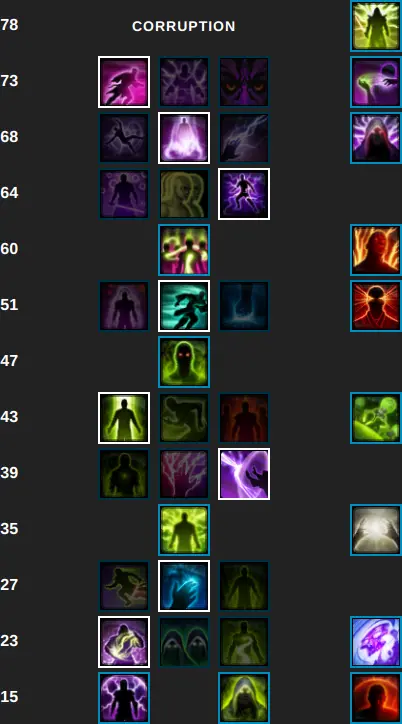
Standard Build
This is your default build for healing in tank games, AOE situations, or 8v8 warzones. It has slighly lower burst healing in exchange for the ability to spread your Resurgence heal-over-time effect to up to 3 additional targets. Your implant (Revitalize) will cause your Revivification AOE heal to proc additional healing on spread targets, creating a field of intense periodic healing that is your bread and butter for keeping up with AOE and periodic damage.
Discipline Tree
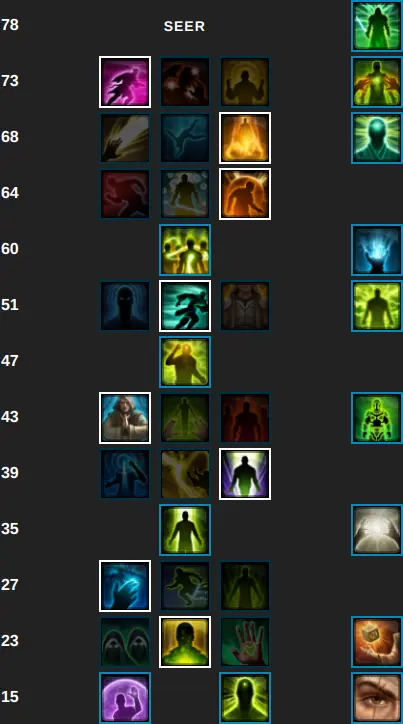
Single Target Build
If you have no use for spreading your Resurgence, for instance if only one player is taking damage, then you may as well swap that talent out and receive a 15% buff to your burst healing from Dark Heal and Dark Infusion.
Discipline Tree

Do not ever take Rally. It is a trap set by the developers. In AOE, delaying your better AOE healing abilities to cast this is either an HPS loss, or a loss of force (which is a long-term HPS loss). In single-target scenarios, or to even out one egregiously low health bar resulting from a missed guard swap, Sustained Corruption will do the same thing better.
Rotation
Abilities
Corruption has six rotational rotational heals which you will use frequently, and one very situational heal in the way of Dark Infusion.
For healing cleave, you will use abilities in priority order, meaning always activate the ability with the highest priority that is off cooldown at any given time, and place it on the target that is currently taking the most damage. Rare exceptions exist where you will have to heal someone who is not actively taking damage because their health has gotten so low that they will die from AOE damage, dots, or their own defensive cooldowns (for example Juggernauts' Endure Pain). This is called being behind the damage, and it is a very bad state to find yourself in when healing against pressure. Generally the only way to recover from this is to force one of your teammates to pop a strong defensive cooldown, which can buy you time to catch up. You will likely also need to resort to single-target ability combinations in this case.
For healing single target, a priority system will not work. Several of your abilities require your Force Bending passive to activate instantly, and the difference between them healing instantly or eventually can cost a teammate's life. For this reason, you will use a modified priority system consisting of ability combinations, where you should only activate a given combination if all its abilities are ready to be used in sequence, and otherwise resort to using single-ability fillers.
For setting up your bars, you want to put Resurgence, Roaming Mend, Innervate, Dark Heal, Revivification, , and Consuming Darkness in easy-to-reach places. Notice they are 71% green. Most healers in this game place an over-emphasis on controlling the enemy team and fall behind on their first and most important responsibility, which is keeping up with incoming damage. I will not mince words, this makes them bad healers and loses them games. Control is entirely secondary to healing, and off-DPS in PvP is throwing unless you can literally kill the target with one ability.
You will also want some access to Dark Infusion, Electrocute, Overload, Shock, Force Lightning, and Crushing Darkness, but feel free to put these on keys with shift-modifiers because they will not be used as often.
Offensive Cooldowns
You have two offensive cooldowns on sorc, these are Recklessness and Polarity Shift.
Recklessness will make your next two abilities crit, guaranteed, but it won't increase their critical bonus healing like a normal autocrit would. Many healers make the mistake of holding this until their team is "low", failing to realize that being at 75% already puts them behind, and as a result lose Recklessness activations. As a rule of thumb, you want to use Recklessness with Innervate and either Unnatural Preservation or a proc'd (glowing) Dark Heal, depending on whether you are the one taking the most damage, as soon as all three of these are off cooldown. Worth noting that Revivification will not consume Recklessness charges, so you can do something like Recklessness, Innervate, Revivification, Dark Heal if you don't already have a proc ready.
Polarity Shift does a couple of things. First, it makes you immune to being interrupted or having your casts slowed in any way. Second, it increases your alacrity (as in, your cast and GCD speed) by 20%. This is a significant increase to your healing output so you want to make sure you don't waste its uptime sitting in a stun. The best way to do this is to pop Polarity Shift the first time you come out of a stun chain with whitebar and you have it off cooldown. This has the added benefit of helping you recover from the damage your team took while you were stunned. If I am being stunned out but not taking damage, I will generally hold my Unbreakable Will if I have Polarity Shift available to recover once I am whitebarred, excluding of course if any of my teammates will die during or shortly after the stun.
Cleave Rotation: Priority System
Unless someone is in immediate jeopardy of dying (see burst combos), use the ability highest on this list that is off cooldown at any given time. Usually you just want to target the same player as the enemy DPS, but occasionally there is value in spreading healing abilities around to ensure equitable distribution, especially in cleave or split damage scenarios. This is a judgement call you have to make based on your team's health level and the incoming damage profile.
- Roaming Mend
- on yourself — This will stun enemies and give you breathing room to cast.
- Revivification — Place on top of as many allies as possible.
- Resurgence
- Consuming Darkness — Weave about one of these in per Innervate to maintain your force.
- Innervate
- Dark Heal with proc (when it glows)
- on others
Using Resurgence immediately before Roaming Mend should be avoided if possible, as it will waste Force Bending.
Mobile Cleave Rotation
This rotation will keep your revivifications and spreads going out regardless of how much you are interrupted, stunned, pushed around, or ragdolled, and can be utilized while moving. Fall back to this when you are being heavily tunneled or permanently sat on by one player in tank games so you can focus on mitigating damage by way of your positioning. Follow the rotation in order and repeat.
- Resurgence
- Revivification
- Filler
- Filler
- Resurgence
- Innervate
- Filler
The priority for fillers is:
- Roaming Mend
- on yourself
- Consuming Darkness at least once per rotation, twice if low on force
- Dark Heal with proc
- on others
Burst Combos
You have two primary burst combos that can shoot somebody's health up. When neither is available, fill with the highest ability on the filler list your have available. We can treat this like a priority system:
- Resurgence + Roaming Mend
- Resurgence + Revivification or Dark Infusion
- Consuming Darkness when pressure is light—try to use one per Innervate.
- Innervate
- Dark Heal with proc
Generally you'll choose Dark Infusion over Revivification if you can stand still and freecast without being interrupted, and Revivification if you need to move or avoid being interrupted. If you are the enemy team's tunnel target, Revivification is always the right choice.
Force Management
Corruption is the only spec in the game that has active resource management. This means that unlike DPS specs or other healers you may be used to, your energy will not regenerate on its own, and you will need to periodically waste GCDs on Consuming Darkness to ensure you don't run out. This is actually quite strong, because it allows you to dump your force in times of urgency, and regenerate it in times of safety. It does, however, have the major downside of being extremely unintuitive to learn.
By default, and on DPS specs, Consuming Darkness gives you a debuff which decreases your natural force regeneration, and should be avoided unless absolutely necessary. However, as corruption, whenever your Innervate critically heals, you will receive a buff which allows you to use Consuming Darkness without penalty, instead granting a buff called Reverse Corruptions which will actually increase your natural force regeneration rate. No matter if you are splurging or playing conservative, you want to keep this buff up at all times, which means proc'ing and using Consuming Darkness at least once every 10 seconds. If for some reason you are screwed and need force immediately, you can also consume this buff by using Consuming Darkness without the proc, which will prevent you from receiving the Weary debuff that nukes your force. You never want to have Weary stacks on you, so make sure to keep Innervate and Consuming Darkness coming out regularly, at about a 2:3 ratio. There is a rhythm to this which you will get the hang of as you gain experience.
It's also worthwhile to note that you do no healing while you are regenerating force with Consuming Darkness, so it's advantageous not to take damage while you use it. If you have the opportunity to step behind a pole, wall, or other object before you need to use a series of these, you should make it a priority to do so.
Force management is pretty free-form, but always prioritize the survival of your teammates over sustaining your force pool. Your left-over force will do you no good at the end of a match or going into the next round.
Chasing Targets
PvP healing is very different to PvE. There are many classes which cannot afford to sit still and let you cast a rotation on them, because the damage they take will far outpace your heals, and many more which will benefit from kiting although they could probably afford to sit still and tank the damage. Your responsibility as the healer is not actually to produce the largest HPS number possible, but rather, to create the smallest possible [incoming DPS - incoming HPS] value, and therefore in order to play competently you have to kite with your target.
Recall that by substituting Dark Infusion for Revivification in your second healing combination, every single ability you use can be activated on the move. Very few specs have this luxury, and fewer still have the ability to keep up with your mobility while eating the amount of control you can put out. This means that you are actually at a massive advantage when following a kiting target around objects, changing levels, running behind walls, et cetera, as opposed to standing still. You will likely be within melee range of your healing target to get maximum value out of this strategy, and there's nothing wrong with that.
If your target does happen to be faster than you, you can also wait for enemies to reach them and then use Extrication to pull them back to your location, creating separation in the opposite direction and likely confusing many of the enemies along the way. This is a strategy that becomes particularly useful when paired with a level change from low to high. If you can pull your target from downstairs to upstairs on a two-level map it's very unlikely all the enemies can follow them, particularly if you use Overload to knock anyone that spends a gap closer on it.
In summary, if you find yourself thinking "he's line-of-sighting me, I can't heal him!", you need to reframe the problem as "I can't keep up with him.", and then set about solving the problem from there. Recall that Force Speed will purge every slow or root in the game, and using Expunge on yourself will cleanse all but a few. A particularly tricky situation may require you to take Surging Speed for access to more speed boosts and movement buffs, but nothing in the game should be able to outrun you once you are spec'd into it.
Cleansing
You're likely familiar from reading the ability description that Expunge will cleanse up to two hostile removable effects from an ally (or yourself). What you may not be aware of is the fact that those effects can include crowd control such as hardstuns, mezzes, roots, and slows. Cleansing these effects in time can save your teammates from otherwise certain death, and should be prioritized over regular healing.
At baseline, sorcerers can cleanse all mental and force effects, including the hardstuns and mezzes of all force classes (Electrocute, Force Choke, Intimidating Roar, Spike / Maul Spike, and Whirlwind), as well as all saps (when stealthers sleep your teammates from stealth with Mind Trap or Sleep Dart), and mercs' Concussion Missile. Healers additionally gain the ability to cleanse physical effects, which include fun things like Low Slash, Crippling Slice, Debilitate, and Maim. Anyone with a cleanse can cleanse Seismic Grenade.
Basically, as a sorc healer you can cleanse your teammates out of any cc other than Flashbang and Carbonize, and you should do so whenever possible, because this can rapidly alter the trajectory of a round. Expunge does have a cooldown, however, so occasionally you will have to make a choice about which of your teammates to cleanse. In general, if you have the option to cleanse another player that can in turn cleanse your other teammates (a sorcerer, mercenary, or operative with the necessary awareness to know this mechanic exists), you should do so. If you have a tank, you should prioritize them next. After that, it's up to you to make a judgement call about who is in the most immediate danger, or whose several seconds of additional gameplay would be the most beneficial to your team.
Defense
Your defensive strategy on sorc healer can be summarized as Cannot see target. DPS have a limitation where in order to do their job, they must be within line-of-sight (LoS) of their target. You, when healing yourself, do not share this limitation, and abusing this well will enable you to slow down incoming damage to a level that you can heal through.Your bread and butter will be to do Nascar laps around poles, walls, crates, GTN terminals, and any other line-of-sight objects available. If opponents are keeping up well, you have several options:
- Reverse direction to throw them off.
- Use Overload to root them on one side of the object while you go cast on the other.
- yourself to stun them and buy some breathing room. You will actually want to start chasing enemies once you do this to make sure the stun hits them.
- Force Speed to a different LoS object if your current one has become too crowded.
(1) and (2) will generally be sufficient to shake even a skilled attacker, but you may need to use Expunge to cleanse a root or slow on yourself every once in a while to keep them from catching up. Once multiple attackers join in, it's time to start pursuing alternatives (3) and (4). I would generally advise saving Phase Walk, Unbreakable Will, and for when you are stunned and can't kite anymore. This means, when you start taking even a little bit of damage and aren't stunned, your first stop should be the nearest LoS object.
Unnatural Preservation
People are generally not as negligent about using Unnatural Preservation on healer as they are on DPS, but still. It's free healing, use it off cooldown.
Major Defensive Cooldowns
As a sorc, you have three (two and a half, really) defensive cooldowns that will help you out of big trouble. These are Phase Walk, , and Unbreakable Will. The ideal cooldown rotation would have you use Phase Walk the first time you are stunned, Unbreakable Will some time later if you are caught up to and stunned again, and on whitebar if you are restunned after that. This is ideal, but not always possible, so at minimum make sure to use all three of these before you die. Major cooldowns are really only necessary when you are caught in a stun (or a very nasty root), however, so when you are un-stunned you should be using Force Speed to repositioning yourself to safety.
Kiting Tricks
As a healer, the default hard tunnel scenario is relatively easy to deal with: do Nascar laps around an object, heal yourself, and use major DCDs when stunned. Therefore, this section will deal with some of the more effective strategies players will try and employ to counter this, and how to counter them back.
Sitting and Swaps
Much more annoying to you than direct focus will be having 1-2 players on you, stunning/interrupting, while the rest of your team is still dying and needs your help. The way to deal with this is as follows:
- Use the mobile cleave rotation.
- Bait enemies to the other side of an object from where your team is.
- Heal yourself with Roaming Mend, proc'd Dark Heal, Resurgence, or the latter few ticks of Innervate.
- (Optional) Strand enemies using Overload, , Electrocute, or just good old fashion jukes.
- Return to the same side as your team and AOE heal them with Revivification, Resurgence, proc'd Dark Heal, , or the first tick of a self-targeted Innervate (this will spread your Resurgence to the team). This is also the window where you can manage force or, if you've successfully marooned your attackers, attempt a hardcast.
If you're a swap target you should employ this strategy as well, if for no other reason than to be available to be swapped on as little as humanly possible. You should only be visible to your attackers when you're healing a teammate that can't be reached from any other angle.
Phase Walk Usage
Healing is much more forgiving than DPS specs regarding Phase Walk placement, but this is still your bread and butter for escaping stunlocks. Because of this, like on DPS, it's important to have it set before you engage in combat. You can't afford to sit in spawn or engage late, lest you risk being forced to use your cooldowns out of order, significantly gimping your survival.
As a healer, you want your phase walk close to where your team is playing, so you can return quickly if DPS swap to your teammates, but still LoS'd off from where the fight is happening by an object, so you can sit out a stun and maybe cast a heal or two on yourself before re-engaging. Nearly any object will do, I leave this to your discretion.
Using DR
As corruption, you get Cloud Mind essentially for free in your ability tree, which will increase your damage reduction by 25% for 6 seconds. Ideally you will want to use this or your Warzone Adrenal whenever you are caught out in the open, which should be rare, and try not to stack the two as either one is generally be sufficient to render incoming damage healable.
Surviving Net
Many new sorcs think they have everything figured out and then suddenly find all their major DCDs grayed out and themselves globaled. This is the result of an ability that Mercenaries have called Electro Net. Electro Net lasts 9 seconds, deals a great deal of damage over time, and disables Force Speed, Phase Walk, and . It can be dispelled by using Unbreakable Will, but you will have to save your breaker for this purpose. The ideal maneuver when dispelling net in this way is to then Force Speed to a safe location and heal through the dot damage.
As a healer, a net alone is not generally enough to be threatening, but it does open up the possibility of ending up in a much more dangerous situation. If you are stunned on top of net, for example, your only two options are: (1) break the net with Unbreakable Will, or (2) go AFK and pray. Likewise, if you allow yourself to hit low health and then get netted, the slow applied will reduce your mobility to a point where kiting becomes difficult and you can easily be bursted to death by a well-positioned opponent. For this reason, when you are taking damage and mercs are present, it's best to simply save breaker and avoid ending up in one of these nightmare scenarios. Your other two major DCDs are generally enough to dissuade mercs, who have very poor mobility and control themselves, from chasing you.
If you are netted without either low health or a stun on top of it, I would not recommend breaking the net. This is particularly important when multiple nets are present on the enemy team—try not to break until you are both stunned and netted on top of it. If you survive all the nets without that happening, you are then free to use your breaker as you please. An unstunned net is a particularly good opportunity to use Cloud Mind or Warzone Adrenal if you have either one available, as well as to stun or knockback any enemies within reach. Having done all these things and starting from a strong health percentage, it will be very difficult to kill you within 9 seconds, however, you may still need to take cover behind LoS to reduce damage further. You may also need to spend your Warzone Medpac to buy time if you happen to be caught out of position.
Demo
Here is a video demonstrating how to heal under heavy pressure.
Advanced Techniques for Tank Games
Don't pay too much mind to these concepts when you're first starting out, but coming back to them may help you win more fights in the future once you've got the basic hang of this spec.
Controlling Enemy Healers
As a healer, you are effectively engaged in a survival race against the enemy healer, and running is not the only way to pull ahead in this race. You also have the opportunity to shoot the enemy healer in the foot by interrupting their casts with Jolt. The easiest way to do this is with Focus Target, an in-game ability which will enable you to see all the enemy healer's casts and interrupt them without even having to change target.
Focus target can be enabled via Settings > Controls > Enable Focus Target. Once enabled, you can set keybinds for Set Focus Target (defaults to Alt+F) and Focus Target Modifier (defaults to F). At the beginning of a round, you'll want to target the enemy healer and use Set Focus Target. Then, when you see their casts appear on your screen, hold down your Focus Target Modifier key and use Jolt.
You can also interrupt the enemy healer's casts by stunning them with Electrocute, but first ensure that they are not whitebarred (a white bar will appear under their character name, indicating that they are currently immune to being stunned). Against sorc healers, the ideal time to do this is when they pop Polarity Shift, which you can tell because you'll see the casts that appear on your screen get faster. Against merc healers, you want to stun during their interrupt immunity windows, which you can tell are happening when you press your focus target modifier and Jolt is grayed out. Against operative healers you can stun any time, but make sure your team has a follow-up stun ready. Operative healers are virtually unaffected by short stun windows, but long ones threaten to let their kolto probes drop, which is a major HPS loss.
Some healers get carried away and start interrupting using Overload. I do not recommend this approach for a number of reasons, but suffice to say that it is simply not worth it. You are wasting one of limited GCDs in which you can heal your team; you are giving the enemy healer resolve for free, limiting your team's ability to control them; you are wasting your knockback, which could be better utilized for your own survival or to separate the enemy tank from your team's target; and you are ruining your own positioning, exposing yourself to a lot of unnecessary damage for the sake of interrupting a single cast.
Hardcasting Revivification
Hardcasting Revivification is easier on your force than instant-casting it with Resurgence, resulting in an HPS gain. However, getting it interrupted is an HPS loss. So, if you want to try and milk the extra HPS from this, it's important to ensure the enemy team is not able to interrupt you.
Kick Baiting
When enemies try to interrupt you, the best way to thwart their efforts is with something called kick baiting. The premise is, immediately before you cast something that you do care about (Revivification), attempt to cast something that you don't care about (Dark Infusion) so that anyone in the habit of interrupting you has just put their interrupt on a long cooldown while you cast what you care about. The ideal timing for this is to bait with Dark Infusion when Revivification has about 1 GCD left on its cooldown, so as not to delay your AOE healing if the Dark Infusion actually goes off.
Abusing Swaps
If the enemy team does not have a healer and/or ranged DPS interrupting you, it is easy to abuse the short attention span of melee DPS to get hardcasts off by timing your Revivification. Very simply, if the enemy team has been targeting you for a couple seconds and is about to swap on your teammate, hardcast reviv. If they have been targeting your teammate for a couple seconds and are about to swap on you, instant cast it.
Positioning to Hardcast
When the enemy team's healer and/or ranged DPS try to interrupt you, it's also fairly easy to deny them the opportunity by standing where they cannot see you. The tricky part of this is finding an angle where you can still see your team. Generally this means rotating around a small LoS object, occasionally peeking out to see where your team is playing. AOE abilities are pretty generous about being used around walls, so you can even dip into cover when you cast Revivification, or begin channeling Innervate on yourself in the open, then complete the rest of the cast while walking behind cover. This is the ideal way to move while freecasting, as you'll delay the enemy team's attempts to mezz or stun you out as well.
Bubble Stun as a Cast Window
If the enemy team is stacked, you can stand in the middle of them and use the 2 second stun from to protect your hardcast, provided you start casting immediately after (or better, slightly before) the stun goes off.
Clicking off Revivification
This is kind of a gimmick, but if you really want to maximize your HPS it's worth noting that clicking off the HoT from Revivification while still inside the circle will cause you to pick it up again with full duration, allowing you to get more healing out of the same ability. In real combat this seems way too miniscule to be worth the effort, but perhaps if you're sitting AFK in a stun or something you can get some value out of it.