SWTOR 7.9 Madness PvP Guide
The Madness Playstyle
Let's not beat around the bush here. This spec is insane right now. You can win 1v2s, 1v3s, facetank and heal through people's entire rotations, and generally outside of a PT, a rage jugg, or a deception assassin hitting you, have nothing to worry about as long as you do the rotation correctly to keep getting healed. That said, even though you can literally roll your face on the keyboard and do pretty well on this spec, if you elect to play it intelligently and kite rather than facetank, there is EVEN MORE that you can do to make an enemy team's life completely miserable. What I will attempt to do in this guide is show you how to make the most out of a spec that already gives a lot without much effort. If you follow along, you will almost certainly have people raging at you in general chat after matches, which is of course the highest form of flattery.
Disclaimer
Be warned, however: I'm not nearly as good at madness as I am at lightning or corruption. I have probably one one-hundredth the hours played on this as the other two. Therefore, what I will try to show you is not so much madness-specific trickery, but rather how to apply the fundamentals of the sorcerer class using the abilities this spec provides.
Viable Madness Builds
At difference to lightning, you can pretty much build this spec any way your heart desires and still do pretty well. However, there are still two primary builds I recommend that will perform better than others, and of course it never hurts to have your gear correct either.
Stim
Use Advanced Kyrprax Versatile Stim. Do not pass go, do not collect two hundred dollars.
Gear and Set Bonus
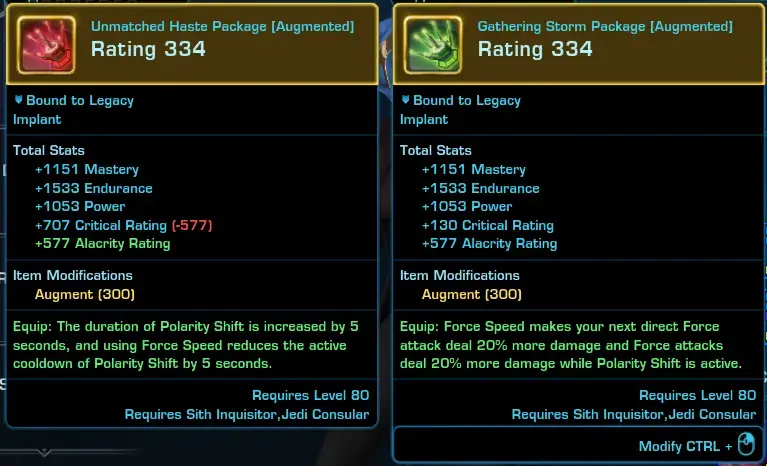
The gearing strategy is actually quite simple. For legendaries, you want Gathering Storm Package and Unmatched Haste Package, in that order. Without Gathering Storm, Unmatched Haste barely does anything for you, so prioritize Gathering Storm.
For regular gear, you want the best item level gear you can get at any point in time. I recommend using the 1.4 GCD alacrity build, which will require 4 alacrity pieces, one of which is your Gathering Storm implant. Thus, in addition to your legendaries, you will need to get 3 alacrity enhancements and 5 critical enhancements. The moddable gear vendor Hyde and Zeek is far and away the easiest way to do this, it isn't worth bothering with any other method.
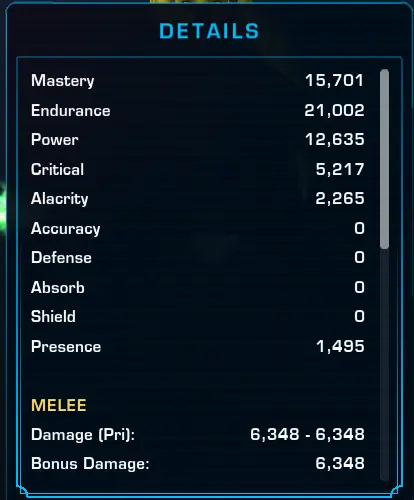
Madness Stats (332)
Sorc DPS Implants
Augments
If you use the build I've prescribed, all of your augments should be crit augments. If you're freestyling, you'll want to use augments to reach the proper stat threshold, that being 2054 alacrity. The rest of your stats go into crit. Do not use accuracy on a sorcerer in PvP, it is a complete waste of stats. You can spill over a bit on alacrity which will help to compensate for poor latency or a bad connection.
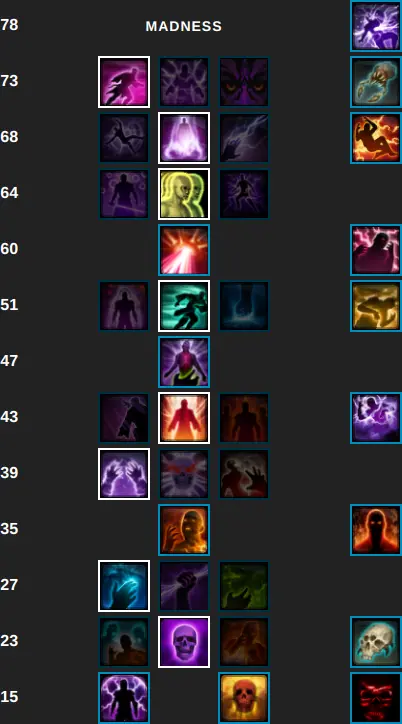
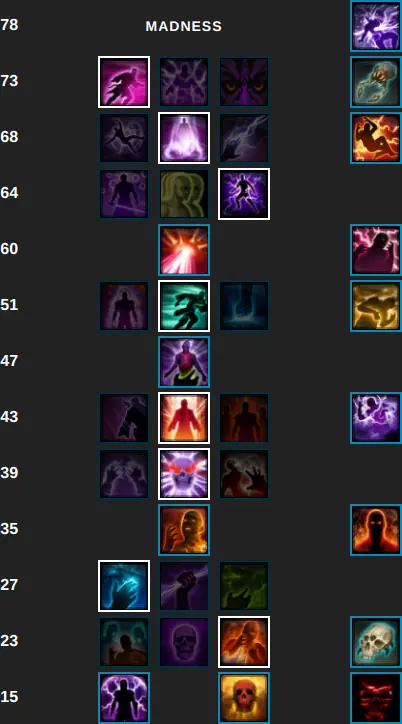
The Dot Spread Build
The first build I'll give you is pretty safe to run all the time—it has good dot spread potential, so you're able to farm damage, the survivability is solid, and if you push it to its limit it even has the capacity to win 1v2 and 1v3 engagements.
Tactical Item
You will be running the Killing Field tactical, which will spread your Demolish to all targets within 8 meters that have recently been affected by your Death Field.
Discipline Tree
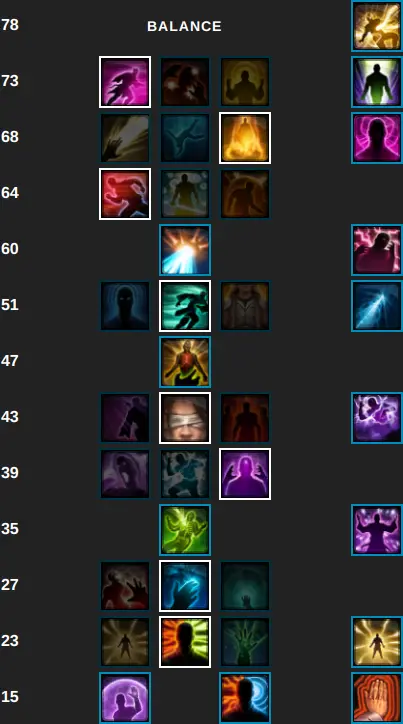
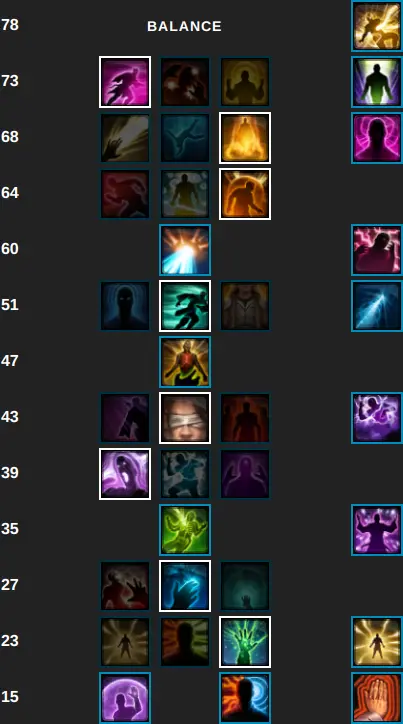
The Single-Target Build
The second build is more of a special case—when the enemy team is full of ranged players you need to chase around, or you are under serious focus fire, the heals and slows from Death Brand can provide that extra sauce needed to squeeze out a kill, or escape the situation alive.
Tactical Item
You will be running the Tempest of Rho tactical, which will cause your Force Lightning to do torrential damage to targets affected by your Creeping Terror during your filler windows (of which there are many in this spec).
Discipline Tree
Rotational Adjustment
With this build you will want to prioritize Force Leech slightly higher than Demolish, as the latter can now only hit one target. You will also never use Lightning Strike with this build, preferring to use a partial channel of Force Lightning instead.
Level 64 Choice
Depending what you're playing against, it may be advantageous to swap out Backlash at level 64 for Unnatural Vigor. Generally, more ranged classes, juggernauts, and marauders will warrant a swap to Unnatural Vigor, while more stealthers will warrant a swap to Backlash. Given how immobile the madness rotation is, you generally won't get full value from the mobility provided by Surging Speed, but you're welcome to play with it and it certainly won't be a bad option in any case.
Offense
Abilities
Madness has seven rotational rotational attacks which you will use frequently. These are Creeping Terror, Affliction, Death Field or Death Brand, Demolish, Force Leech, Force Lightning, and Lightning Strike.
Offensive Cooldowns
You have two offensive cooldowns on sorc, these are Recklessness and Polarity Shift.
Recklessness will make your next two abilities crit, guaranteed. As a rule of thumb, your hardest hitting abilities are Force Leech, Force Lightning, and Death Field or Death Brand, so you want to try and spend Recklessness on at least two of these three abilities. Recklessness unfortunately does not line up very cleanly with the madness rotation the way it does for lightning, so if you lose both charges critting a multi-target Death Field, it isn't a huge loss. Realistically, madness's damage profile is so flat that there isn't any ability which it would be grievously incorrect to spend a Recklessness charge on. If you're low on health, you can even spend it on Unnatural Preservation to quickly get back to a more sustainable level.
Polarity Shift does a couple of things. First, literally just increase all your damage by 20% for 20 seconds. Pretty nice. Second, makes you immune to being interrupted or having your casts slowed in any way. Very nice. Third, it increases your alacrity (as in, your cast and GCD speed) by 20%. Like Recklessness, this ability does less for you on madness than lightning, but still push this button off cooldown while doing damage.
Rotation
Traditionally, madness rotation goes as follows:
- Force Lightning
- Demolish
- Creeping Terror
- Affliction
- Polarity Shift and Recklessness
- Death Field or Death Brand
- Force Leech
- Force Lightning
- Lightning Strike
- Force Lightning (3/4 of a channel)
Given our two tactical selections, however, I recommend the following adjustments.
Rotation with Killing Field
- Creeping Terror
- Affliction
- Force Lightning
- Polarity Shift
- Death Field
- Demolish
- Recklessness
- Force Leech
- Force Lightning
- Force Lightning — repeat until Creeping Terror is close to falling off
Rotation with Tempest of Rho
- Force Lightning
- Demolish
- Creeping Terror
- Affliction
- Polarity Shift and Recklessness
- Force Leech
- Death Brand
- Force Lightning — spam until Demolish comes off cooldown
Heal Allocation
It's important to note that simply doing your opening combo of Force Leech and Death Field or Death Brand with all the appropriate buffs will heal you close to 100,000 health. If there is any chance that you will take damage in the near future, you want to delay at very least the Force Leech until your health is lower and you can get some value out of its heal. In the meantime you can use Force Lightning to proc and apply Demolish. An excellent example of this is when two madness sorcs of similar skill duel, the one that uses Force Leech at 100% health will almost always lose due to the opposing sorc healing off all the damage from his opener. Be mindful of this and it will win you a lot of otherwise even exchanges.
Target Selection
As an arena player, your first target should obviously be any that comes in egregiously unprepared and doesn't pop their defensive cooldowns properly. However, barring a situation like that, it's useful to know which classes are easiest for you to hit in this spec. These will be as follows:
- Snipers. Snipers' DCDs are, in no uncertain terms, pitiful, when pitted against your damage profile. Sniper defense is grounded in the ability to roll and avoid spike damage, then shield the very little additional damage that comes their way outside of these spikes. Your damage graph, however, looks like a straight line—it doesn't have any spikes, so there is nothing good for them to roll besides Force Leech. As such, I recommend just avoiding Force Leech altogether when tunneling a sniper in order to make their life maximally miserable (and minimally lengthy).
- AP Powertechs. AP defensives are almost entirely armor-based, which means that you as a dot spec barely care about them at all. If the powertech pops Emergency Power (the glowing white bubble around themselves), use it as a window to refresh your dots on them, generate Wrath stacks to proc your next Demolish, or treat it like an operative rolling for 2 GCDs (ignore them, do something else that's useful), and then go back to dumpstering. Unlike as lightning, you don't have much burst to chunk through Kolto Overload, so generally it is a good idea to swap targets when it's popped. However, if the powertech makes a mistake and pops it in the single-digit health percentage range, some good old fashioned Force Lightning spam should be enough to finish them off through it. Killing a powertech is slow, but you will almost always succeed. AP is much more of a defensive than an offensive problem.
- Juggernauts. Juggs are like PTs but with more healing and less potential to kill anything. You can go them and much like PTs they will eventually die, but normally your team will kill them anyway and it's more useful to use your damage profile on something that's a bigger threat. That said, if your teammates are ignoring a jugg that's low or has spent DCDs, certainly don't just let it heal.
- Mercenaries. Mercs don't actually have bad defensives, but there's very little they can do against dots and AOE damage, which you have a great deal of. When a merc pops energy shield or reflect, use it as an opportunity to reapply your dots to them, and use Death Field if you're taking it. Do not use Death Brand, however, as it is classsified as single-target damage and will give them a heal. Kolto Overload there isn't much you can do about, so just reapply dots during it and swap to another target.
- Marauders. Killing maras is much nicer on madness than lightning. Don't really have much recourse against your dots, which will slowly eat them away and delay their ability to heal out of combat when they vanish. As long as you don't hit into Undying Rage (just swap targets), and chase them down after they vanish, marauders should be a slow but reliable kill target.
- Pyro PTs While Powertechs are normally easy enough to kill, pyrotech's passive defenses against dot damage make them hellish for you to kill. While they can't actually purge your dots like the specs lower down the list, they will take 30% less damage from them at baseline, in addition to farming multiple koltos from your extremely flat damage profile. Unless you have multiple burst spec teammates that you trust to survive the powertech's onslaught (in order to catch it between koltos), I recommend selecting a different target.
- Concealment Operatives Operatives are kind of a nightmare to tunnel as a dot spec. Their ability to purge your dots every 20 seconds, combined with their hots, and the fact that you need to cast and channel very predictable sources of damage makes it very inconvenient to do damage to them. Nevertheless, if the operative is specced into concealment (make sure you know this for certain), their lack of damage reduction and your near limitless ability to facetank damage will actually render this a winning matchup for you. When hitting a conc op, make sure to delay your GCD a bit (like 0.1s) in order to determine whether they will spend their GCD on a roll (which will resist whatever you use), and then if and only if they use it on something else (like an attack of their own, or a kolto probe), use offensive abilities on them. If they roll, you can use a heal on yourself or a teammate to pass the empty GCD. Since your burst (outside of dots) comes primarily from Force Leech, you will need to fake cast leech and interrupt it yourself in order to bait the operative's rolls, before you can actually get it off. Ensure that you keep the operative rooted with Creeping Terror and Overload so that you can use casted attacks on them. Generally you will want to start with Creeping Terror because its cooldown is shorter, and re-root with Overload if the operative purges the effect via Evasion or Holotraverse. If the operative breaks the second root, you can apply a third whenever your Creeping Terror comes off cooldown, and then have your way with the operative. It is also fairly safe to stun an operative while they are rooted, as they cannot roll it. To maximize control, I recommend using Force Leech while the operative is rooted, and following it with Electrocute and a full cast of Force Lightning into Demolish. There is also trickery with bubble stun you can use to get free Force Leeches on melee players for healing or damage purposes. See the "Locking Down" for tips on how to abuse players with your roots and stuns.
- Assassins. Killing sins takes forever. They have three health bars and normally will hide in stealth until getting a fourth. They will also use Force Shroud to purge your dots and avoid your burst windows, and you do not posess the burst potential in this spec to make them panic. Avoid tunneling them unless they have wasted vanishes frivolously or there is no better target available.
- Lethality Operatives. Don't waste your damage, they will just heal through all of it.
Chasing
When you start investing damage into a target, it's incredibly important that you do not then allow this target to escape and heal, wasting all of the resources you spent damaging them. If you are not the enemy team's focus target, it is your responsibility to chase down players that attempt to run away from your team, such as marauders using their camouflage, or snipers and other sorcs using Phase Walk. There are very common locations on each map where players go to try and heal, but until you learn these there are a number of ways to track these players down by hand.
Minimap
The minimap will show a red dot for each enemy player in combat with you. If one of these is far to one side, chances are it is a player trying to escape combat, and you should chase it down.
Name-Clicking
Camouflage will forcibly remove a player from your target, making them difficult to find again. However, spam clicking their name in the enemy players frame can counteract, this causing you to re-target them as soon as they reappear. You can then do a quick walk in all four directions, and whichever one makes the number of meters between you and them (shown on the player frame) decrease is the direction you should head in order to chase them.
Seeing Dots
Seeing as we are applying a permanent dot to our targets before hitting them, it is also quite common to see yellow flytext numbers through walls or in remote parts of the map. This means an enemy player is hiding behind said wall, and you should finish them off.
Locking Down
When a player runs from you, the majority of the time they will attempt to keep running once you reach them. Since we are given two different roots, the following combination of abilities will allow you to prevent a player from moving for an obscene amount of time, and may also cause them to throw a rage fit. You can also stun them afterward with Electrocute if you have it available in order to get maximum lockdown value.
- Affliction (if it will fall off before leech finishes casting)
- Overload
- Death Field or Death Brand
- Force Leech
- Creeping Terror
- Force Lightning
- Demolish
You can also use the following combination in tandem with the Backlash talent to punish a melee player that attempts to sit on or 1v1 you.
- Affliction
- Force Leech
- Creeping Terror
- Death Field or Death Brand
This will set up all your dots and debuffs, as well as heal off any opening damage they may have been able to put on you, without the enemy player having any recourse whatsoever (unless they waste their stun breaker, in which case you can restun with Electrocute and kill them in short order.) Madness is one of the best dueling specs in the game right now, do not hesitate to punish someone for trying to challenge that.
Getting Owned
If you are a new player chasing down a more experienced one, there is a good chance they will be able to turn it around on you, even with a significant health disadvantage. If that happens, it's advisable to disengage in order to survive—a stalemate is better for your team than being down a player. However, you should take note of what happened and how they managed to do what they did. There are a million niche kiting tricks in this game and the only way to learn them is going head-to-head with better players. Remember: being beaten is not the same thing as throwing. Throwing would be not attempting to chase the player at all. Just recognize when you've been beaten, learn from your mistakes, and you will improve dramatically in a short period of time.
Defense
If you've ever watched very good sorcs like Durmoth and Lyala play in 5.0 and 6.0, you will notice they play with a very peculiar style—they play slowly, tactically, control their opponents extensively, use line-of-sight objects to minimize incoming damage, and only expose themselves to fire when their targets are particularly vulerable, having no defensive cooldowns active. This is the prototypical way to play a sorcerer. You have no particularly notable defensive cooldowns of your own, only repositioning tools and stun breakers. While in this spec you can afford to use these tools as panic buttons because they have a considerable amount of healing attached, it will pay much greater dividends to play intelligently and leverage your positioning and your ability to move and heal passively while not stunned, in order to outplay the DCDs of your opponents and strike at their weak points. This playstyle is essentially optional at the moment. Given the strength of madness you can win almost any engagement pretending to be a powertech and charging in nose-first. That said, actually playing like a proper sorcerer will supercharge the already hyper-strong kit available to you and make you feel like you have superpowers.
Unnatural Preservation
Before we even get into the macro-gameplay of sorc defensives, let me introduce you to my number one pet peeve when watching other sorcs play. This is my friend Unnatural Preservation. What Unnatural Preservation does, is heal you. No strings attached. It does not cost force, it does not use a GCD, it has a very short cooldown, and you can even spend Recklessness on it to make it heal more. The sooner you use it, the faster it comes off cooldown, and the sooner you can use it again. By delaying this you are literally wasting healing for no reason, and also causing me to despise you on a personal level. In short, if you are below 90% health, PUSH THIS FUCKING BUTTON IMMEDIATELY. While we're at it, do the same thing with , even if you're at 100%. It's a shield so it can't over-heal, and if you're under 100% it will heal you up at a rate of 1% per second without any intervention by you.
Major Defensive Cooldowns
As a sorc, you have three (two and a half, really) defensive cooldowns that will help you out of big trouble. These are Phase Walk, , and Unbreakable Will. The ideal cooldown rotation would have you use Phase Walk the first time you are stunned, Unbreakable Will some time later if you are caught up to and stunned again, and on whitebar if you are restunned after that. This is ideal, but not always possible, so at minimum make sure to use all three of these before you die. Major cooldowns are really only necessary when you are caught in a stun (or a very nasty root), however, so when you are un-stunned you should be using Force Speed to repositioning yourself to safety.
Kiting
Your primary defensive strategy on sorc is the art of positioning yourself in such a way that you take as little damage as possible from enemy players. This art is called kiting. In some instances, kiting is very simple. For example, a concealment operative cannot do damage to you if he cannot come within 4 meters of you. Therefore, stay out of that range most of the time and you are safe. Likewise, an arsenal merc can do very little damage to you if he cannot see you through a wall. Therefore, put an object between you and the merc and you should be alright. These are the basic premises for kiting melee and ranged classes—against melee compositions, you want to place a lot of distance between you and the enemy. Against ranged compositions, you want to place an object between you and the enemy.
Mixed Comps
In situations where the enemy team is a mixed composition of melee and ranged classes, however, the issue becomes much more complicated. Ideally, you want to place both distance, and an LOS object between yourself and the enemy. Generally the way to do this is to time your usage of Force Speed such that you can use it to run away, and then turn a corner of some kind. Some maps are great for this, and others are abysmal. In the latter case, you will have to use some creativity in tandem with the strategies described below in order to escape a tricky situation where you would take unnecessary damage.
Baiting Knockbacks
One of the greatest ways to juke a team of bad players is to bait them into being knocked off a ledge they can't easily climb again. The way to execute this is generally to use Force Speed to take you to a place on the edge of a ledge, and then turn your camera and quickly use Overload on the group of enemies that follows. Excellent spots for this include the vent landing area on Mandalorian Battle Ring, the ramps on Orbital Station, and the hut doorways overlooking the pit on Tatooine Canyon.
Grouping Enemies
If there are multiple players chasing you, you always want to be hitting the closest one in order to slow it down, and keep the enemies in a nice neat clump. Clumps allow you to use knockbacks and crowd control on multiple targets at once, multiplying their effectiveness.
Crowd Control
Speaking of which, another great set of tools to ditch chasers are crowd control effects. Since we've lost Whirlwind with the launch of 7.0, a sorc's CC kit essentially consists of Electrocute and Seismic Grenades, which you can buy from the GTN. Electrocute should generally be used when there is a single leading chaser catching up to you in order to keep him in line with the pack, while Seismic Grenades can be used to incapacitate the entire pack at once while you make a getaway. However, if a player instantly breaks your Electrocute stun, you can immediately follow it with a Seismic Grenade knowing they will then have to sit for its entire duration, and you can use this time to create distance or heal yourself (the former is recommended). Analogously, you can use Creeping Terror on the leading chaser, followed by Overload when the group catches up, in order to perform this trick with roots rather than stuns. In general I would try and use the root variation on cooldown, and the stun variation when you have sufficient distance with Force Speed off cooldown to make a legitimate getaway and potentially regen.
Phase Walk Usage
While the rest of these tools are alright, Phase Walk is by far the best defensive ability sorcerers have. Since its cooldown is the shortest of our major DCDs, we would prefer to use it first in order to get a second one off before dying, and in order to do that we need to have it in a solid position before we ever head into combat. This means we cannot sit in spawn like juggernauts or powertechs like to, as being caught without phase walk set is a death sentence.
When starting off a round as the kill target, the ideal opening is to set Phase Walk at a high level, drop to a lower level, have the enemy team follow you down, and then activate Phase Walk and leave them sitting on the bottom floor like idiots, wasting their entire opening volley of damage (which usually is more than they will do for the rest of the match). This late into the game's life-cycle, however, people are beginning to get wise to Phase Walk strategies, so after activating it you are likely to be chased. For this reason, ideal Phase Walk spots are both at high altitude, and allow you to escape in multiple directions depending which the enemy team tries to chase you from. From here you can just run farther away and preserve the distance you've created until you drop combat and can Seethe yourself to full. This is an ideal situation and will not be possible every time, but at least try to leave yourself room to run away from your phase in the event it gets camped or chased.
TL;DR: Don't Phase Walk into a corner, and don't Phase Walk where you can be leapt to. I leave the rest up to your imagination.
Tab Into Your Attackers
The primary thing that sets madness apart from other specs is the fact that simply doing your rotation, with the exception of Force Lightning and Demolish, on one of the players chasing you, will heal you for approximately 5-8k HPS, which is like having your own (unskilled) pocket healer. This entire block can be utilized while moving, and will additionally slow and root your attackers, so it will make you extremely difficult to kill, even before you've made use of your major defensives.
Generally the best practice while kiting is to apply and Resurgence to yourself on cooldown, apply Creeping Terror and Affliction to the leading chaser every 9s and 18s respectively (half and full dot duration), and utilize Death Brand or Death Field and Force Leech on the leading chaser off cooldown. This will ensure maximum self-healing, rooting, and slowing, all while allowing you to remain mobile and create stall for time and distance.
General Positioning
In addition to active kiting, it is also important as a sorc to be prepared to begin kiting at any second. Being caught out of position (meaning out of range of your Phase Walk or away from any objects you could use to break line-of-sight) can quickly get you killed, or at best force you to spend your defensive cooldowns in an order that greatly reduces your lifespan. Therefore, positioning responsibly while you play sorc entails knowing your Phase Walk range, moving your Phase Walk if you need to chase out of that range, and always staying near an object you can use to break casts and channels targeting you (unless you are in the middle of Force Speed).
Pole-Knocking
One last trick which can be very helpful is what I call pole-knocking, that is, getting around a pole, and then doubling back to knock away an enemy that tries to follow. This is a very specific technique but its potential is high, so here is a video to demonstrate me doing it to a jugg.
Damage Reduction
New in 7.0, and a major contributor to its ridiculous strength, is the passive damage reduction that madness gets from having its dots out. Always have your Creeping Terror and Affliction on at least one target at any given time, in order to take 15% less damage from all attacks, blanket statement. This is ridiculously easy to maintain, but be careful not to be caught without it in the opener. Use Phase Walk to avoid being caught naked in an opening stun, because this is perhaps the time when you are most vulerable to being bursted, and when the burst damage enemy players are able to produce is the largest.
In addition to its passive DR, which should be active at all times, the builds I have recommended have access to active DR every 45 seconds by way of Cloud Mind. Cloud Mind grants 25% additional damage reduction for 6 seconds, and should be used when you anticipate big incoming burst damage. This is an intuition you will develop as you play, but a good rule of thumb is that whenever you are snared or rooted (i.e. it's hard for your character to move), big damage is on the way shortly.
Surviving Net
Many new sorcs think they have everything figured out and then suddenly find all their major DCDs grayed out and themselves globaled. This is the result of an ability that Mercenaries have called Electro Net. Electro Net lasts 9 seconds, deals a great deal of damage over time, and disables Force Speed, Phase Walk, and . It can be dispelled by using Unbreakable Will, but you will have to save your breaker for this purpose. The ideal maneuver when dispelling net in this way is to then Force Speed to a safe location and heal through the dot damage.
For the most part, as madness you will not actually need to break net unless you have the entire enemy team parsing on you at the same time. Generally your passive offheals will allow you to survive a net just by spending your Cloud Mind and Warzone Adrenal on it and continuing your rotation as normal. It can also be helpful to step behind a line-of-sight object, which you should have handy, in order to take cover from the incoming damage. Something I frenquently notice is mercs popping their Responsive Safeguards (reflect) during net, which is a little golden stringy bubble around their character, to try and prevent the use of rotational heals to negate the net. If this happens, you have a number of options available to you. You can simply tab into another target if one is nearby, you can break the net and speed away, you can step behind a line-of-sight object and spam Dark Heal to counteract the dot damage and use Creeping Terror and Overload to root the merc and prevent it from following, or you can simply stun the merc with Electrocute or a Seismic Grenade to negate its damage. This is generally a horrific trade of defensives on the merc's part, so ensure that you punish this behavior by either stunlocking and killing the merc immediately now that it has no defensives that are usable while stunned (if you have your stun available), or typing to your team and moving the merc up next in the kill order so your team can stunlock it for you.
Playing With Supports
Finally, having support roles on your team will change the way in which you kite. Since the supports need to be able to guard or heal you, you will need to stay within their effective range in order for this to work, which quite a small arena to play in. Therefore, we will need to make some adjustments to our kiting style.
Kiting With Tanks
With a tank on your team, you should play as if the enemy team is entirely ranged (regardless of what it actually is). Guard does not require line of sight to function, and thus you should make yourself impossible to catch by playing ring-around-the-rosy with an object an applying slows to the players chasing you in order to slow down the incoming damage.
Kiting With Healers (or Both)
Healing, on the other hand, does require line of sight on the target, so when you have a healer you should (almost always) play entirely in the open field. In order to mitigate melee damage you will still be running away, but this time do so in a circle so that you never actually end up too far from your healer to be healed (or break his casts with line of sight objects). The diameter of said circle should be about 20 meters.
There are two exceptions to this rules, those being:
- If the enemy team is entirely ranged, play is if you had a tank instead of a healer. You will mitigate more damage in this way than you will healing, although a bad healer will rage at you and probably cause a loss in this case. Which brings us to…
- If your healer is shit, play as if you do not have one (that is, if there's a tank, play it like tank games, and if there isn't a tank, play it like all-DPS games.)
Playing Around DCDs
I've touched on this briefly before, but it is important, so let's cover it again. As an arena player of any kind, it's advantageous to only expose yourself to damage when you can do something productive. That is to say, hide behind a wall or an object when a player pops major defensive cooldowns. There are two ways to play this, depending if you are taking damage or not. If you are taking damage, which you most likely will when you are new, it's helpful to time your escapes (your Phase Walk and ) with major enemy DCDs, like a merc or PT's Kolto Overload, or a marauder's Undying Rage. This way, your target can't get free damage on you without taking any themselves. It also makes it so that if they spend time chasing you, they essentially kite out their own DCD, which is also advantageous for your team.
The second situation to consider is when your target pops a major defensive cooldown, and you are not the target (this is called freecasting). In this instance, you should just swap to the second target until the first target's DCD expires in order to avoid wasting damage. Keeping your Creeping Terror and Affliction on multiple targets is actually a net benefit to your damage as madness, so don't hesitate to apply these to all your swap targets.